Pretty Printing HTML
This post is just one in a series that aims to cover the foundations of server-side Swift from first principles. Please consider checking out the rest in the series:
In a previous article we implemented a naive HTML renderer by recursively walking the node tree and rendering each atomic unit. The implementation was simple, and it produced a “minified” version of the HTML since there were no newlines or spaces to make the result more readable. Sometimes we want to produce a string representation that is easier to grok, for example in development mode of a server it can be helpful to have nicely formatted HTML, and it can be useful for doing “snapshot testing” of documents.
“Pretty printing” is the act of taking a piece of data, and printing it to a string that in some sense is aesthetically pleasing. For example, HTML is a tree of nodes that make up a document, and can be printed to a string in a variety of ways:
<html><body>Hello world</body></html>
<html>    <body>Hello world</body>
</html>
<html>
<body>
Hello world
</body>
</html>
<html>
  <body>
    Hello world
  </body>
</html>
Each of those printings represent the same HTML document, yet the last one is easiest to take in. However, just adding newlines and tabs on nodes sometimes isn’t enough. A single line may be very long, and you might want to wrap lines after they flow past a certain page width. For example, the following document has been pretty printed to make sure that no line goes beyond 40 characters:
<html>
  <body>
    Articles about math, functional
    programming and the Swift
    programming language.
  </body>
</html>
Notice that it kept track of its indentation so that the first character of each line matched up. It can even get more complicated! For example, the attributes of a tag can get quite long and when you wrap their values you want to make sure they are aligned together:
<html>
  <body id="home" class="home-body"
        style="background: #fff;">
    Articles about math, functional
    programming and the Swift
    programming language.
  </body>
</html>
Notice how style is aligned with id above and not simply indented two spaces from <body. We can even add another layer of complication by requiring all the attributes to be on newlines if they can’t all fit on a single line:
<html>
  <body id="home"
        class="home-body"
        style="background: #fff;">
    Articles about math, functional
    programming and the Swift
    programming language.
  </body>
</html>
And just to make things even more interesting, let’s also require that if class or style values go beyond the page width, then their values will further be split into multiple lines:
<html>
  <body id="home"
        class="home-body
               active
               logged-in"
        style="background: #fff;
               color: #333;">
    Articles about math, functional
    programming and the Swift
    programming language.
  </body>
</html>
Now that’s pretty! This can be great for taking snapshots of your pages in tests, and then any changes to the document are easy to visualize as a diff because of the liberal use of new lines. In this case, a 40 column page is used to show pretty printing on small documents, but typically you would use something more standard like 80 or 110.
DoctorPretty
To do this type of complex pretty printing we will use a wonderful little library called DoctorPretty written by Brandon Kase. It is based on a fantastic article called “A prettier printer” by Philip Wadler, written 20 years ago in 1997!
The idea is to transform your data structure, in our case Node, into the Doc data structure using some combinators that describe how the lines of the document flow. The pretty printer is then in charge of turning that Doc into a nicely formatted string. We are not going to dive into the internals of DoctorPretty, so you are encouraged to read its documentation and tests.
Pretty printing a node
We are tasked with implementing the following function:
func prettyPrint(node: Node) -> Doc {
  ???
}
Our Node type is an enum with an element and text case, so we can fill in that part:
func prettyPrint(node: Node) -> Doc {
  switch node {
  case let .element(element):
    ???
  case let .text(text):
    ???
  }
}
Let’s assume for a moment that we have two hypothetical functions prettyPrint(element:) and prettyPrint(text:) that know how to print those pieces, then we have:
func prettyPrint(node: Node) -> Doc {
  switch node {
  case let .element(element):
    return prettyPrint(element: element)
  case let .text(text):
    return prettyPrint(text: text)
  }
}
Now, the real work is to implement those functions!
Pretty printing a text node
The text node is the easiest to deal with, so let’s start with that. A text node can fill the entire line up to the page width, and then wrap back to where the text node started but on a new line. We can’t just break the text onto a new line at any point, it should happen at a space in the text. So, we can build an array of Doc.text values by splitting on a space and mapping:
let textParts: [Doc] = text
  .split(separator: " ")
  .map { Doc.text(String($0)) }
We now have an array of Doc values. This is where we get to use a DoctorPretty combinator to decide how these text parts will be laid out in the document. There’s one function called fillSep that operates on sequences of Doc values whose documentation reads:
/// Concats all horizontally until end of page
/// then puts a line and repeats
public func fillSep() -> Doc
That’s precisely what we want! So we can fill in our function as:
func prettyPrint(text: String) -> Doc {
  return text
    .split(separator: " ")
    .map { Doc.text(String($0)) }
    .fillSep()
}
We can give it a very simple test drive. The first step to getting a string out of DoctorPretty is to first invoke renderPretty(ribbonFrac:pageWidth:), which returns an intermediate SimpleDoc value. The parameter ribbonFrac determines what percentage of a line is allowed to be made up of non-indentation characters, and pageWidth determines how wide a page is. Then you invoke displayString on the SimpleDoc to finally get a string:
prettyPrint(text: "Articles about math, functional programming and the Swift programming language.")
  .renderPretty(ribbonFrac: 1, pageWidth: 40)
  .displayString()
Articles about math, functional
programming and the Swift programming
language.
Not super impressive just yet, but still nice how little work we had to do to get there!
Pretty printing an element node
The element node is where all the complexity is. We’ll break this one up into lots of little helper functions. We start with it’s definition:
func prettyPrint(element: Element) -> Doc {
  ???
}
The job of this function will be construct a Doc value for the open tag, all of the children with indentation, the closing tag, and then to stack them all. Let’s imagine we’ve already got the following helper functions:
func prettyPrintOpenTag(element: Element) -> Doc {
  ???
}

func prettyPrintChildren(nodes: [Node]?) -> Doc {
  ???
}

func prettyPrintCloseTag(element: Element) -> Doc {
  ???
}
Note that children of an Element is an optional array since some nodes cannot have children, such as img.
It turns out that Doc forms a monoid, and the <> operation flows the documents together with no spaces or breaks between them. Therefore we can write prettyPrint(element:) in terms of our helpers:
func prettyPrint(element: Element) -> Doc {
  return prettyPrintOpenTag(element: element)
    <> prettyPrintChildren(nodes: element.children)
    <> prettyPrintCloseTag(element: element)
}
Now we just gotta render those 3 pieces and we’ll be done!
Pretty printing an open tag
Well, easier said than done! There’s still quite a bit of work to do. Rendering an open tag consists of the node’s name (e.g. <body), it’s attributes, and then possibly a > and newline depending on children nodes. Assume for a moment that we already have a prettyPrint(attributes:) function that can deal with an array of attributes, then our open tags function can be written as:
func prettyPrintOpenTag(element: Element) -> Doc {

  return .text("<")
    <> .text(element.name)
    <> prettyPrint(attributes: element.attribs)
    <> .text(">")
    <> (element.children == nil ? .empty : .hardline)
}
The most complicated part of this is how we checked if children is nil to determine if we need to print a newline so that children are printed inside the tag. In the case of children being nil we can use the empty document to signify that there is nothing left to do.
Pretty printing an array of attributes
Next we need to implement this function:
func prettyPrint(attributes attribs: [Attribute]) -> Doc {
  ???
}
Assume for a moment that we already have a function prettyPrint(attribute:) for rendering out a single attribute. Then we can use that function to map over the attributes to produce an array of Doc values. We want to concatenate these values together so that they are printed on one line if they fit, and otherwise are all on a newline. There is a combinator that does specifically this!
/// Concat all horizontally if it fits, but if not
/// all vertical
public func sep() -> Doc
Now, if we only apply sep() to our array of documents, when an attribute flows to a newline it will go back to the current indentation of the open tag. However, we want all the attributes to align. There’s a wonderful combinator called hang that does precisely this! It takes an argument for how much additional indentation you want to make, but in our case we want 0.
One last subtle detail before we can write out the implementation of prettyPrint(attributes:). If there are attributes to render we want to prepend a single space to the document to space it from tag. This allows us to have <p id="x"> without accidentally doing <p >. So, the final implementation is:
func prettyPrint(attributes attribs: [Attribute]) -> Doc {

  return .text(attribs.count == 0 ? "" : " ")
    <> attribs
      .map(prettyPrint(attribute:))
      .sep()
      .hang(0)
}
Finally we implement the helper prettyPrint(attribute:) for a single attribute:
func prettyPrint(attribute: Attribute) -> Doc {
  return .text("\(attribute.key)=\"\(attribute.value)\"")
}
Pretty printing children nodes
Rendering the children nodes leans on recursively calling the prettyPrint(node:) function, with a few small additions. First, if the children array is nil (for tags that do not support children), then we want to just return the empty document so that we do not do any formatting:
func prettyPrintChildren(nodes: [Node]?) -> Doc {
  guard let nodes = nodes else { return .empty }

  ???
}
To fill in the rest we can map over the nodes, prettyPrint each of them, and then apply the vcat operator to get a single document with all the children vertically stacked. We also apply the indent operator to make sure that the children are indented inside their parent tag:
func prettyPrintChildren(nodes: [Node]?) -> Doc {
  guard let nodes = nodes else { return .empty }

  return nodes.map(prettyPrint(node:))
    .vcat()
    .indent(2)
}
Pretty printing a close tag
When rendering the closing tag we need to make sure not to do anything for the tags that cannot have children nodes:
func prettyPrintCloseTag(element: Element) -> Doc {
  return element.children == nil
    ? .empty
    : .hardline <> .text("</") <> .text(element.name) <> .text(">")
}
Here we make sure to do nothing in the case that children is nil, and otherwise we go to a newline and print the closing tag.
Conclusion
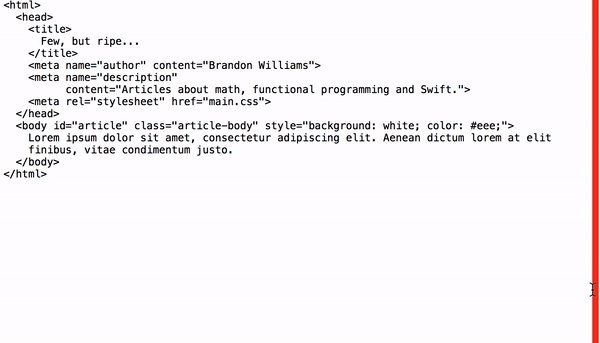
We have now completed the implementation of a basic pretty printer! Here’s a demo of what we have accomplished, where the red line corresponds to the page width of the document:
It is pretty amazing that we were able to implement this advanced of a pretty printer using just a few simple combinators in the DoctorPretty library. It’s a testament to the power of abstraction via algebraic properties. I highly recommend reading Wadler’s original paper, A prettier printer.
Exercises
- Make pretty printing configurable by introducing a
Configtype that is seeded intoprettyPrint(node:config:)and allows the following customizations:- Page width
- Number of spaces for indentation
- “Hang style”, i.e. allowing opting in/out of the “all or nothing” policy of fitting all attributes on a single line before they all break to new lines
- Opt in/out to aligning the
=of attribute key/value pairs.
- In the introduction we mentioned that you could break the values of
styleandclassattributes onto new lines if they don’t fit on one line, but we didn’t actually implement it. Add extra logic toprettyPrint(attribute:)to allow this. Any other attributes that might benefit from this?